Early Bound generator is a great XrmToolBox tool developed by fellow MVP Daryl LaBar. It helps you to generate the strongly-typed classes that can be used in your custom code development projects e.g. plugins, workflows, console app etc. If your are committing the early bound classes into source control, you also should committing the configuration that is used to generate the classes and also make it easy for the next developer joining the team to generate these classes, without jumping into XrmToolBox and clicking it manually. In this post, I will present my approach into streamlining this process.
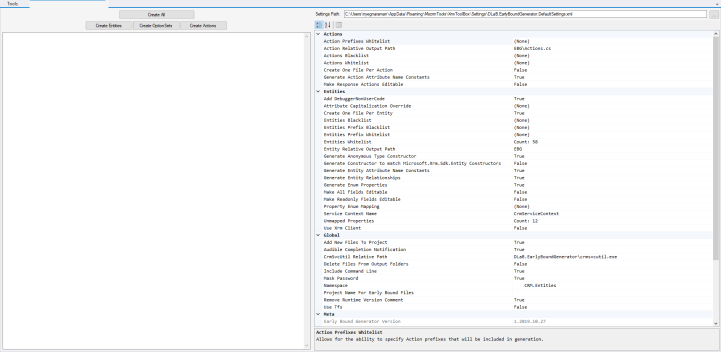
- Generate the files once from XrmToolBox with the settings that are optimal for your requirements
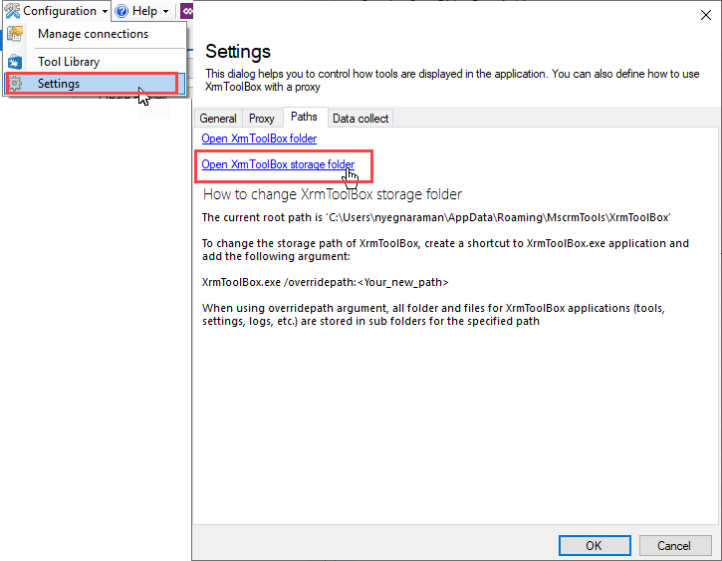
- Locate the the path where all XrmToolBox tools are installed. You can see this by clicking Configuration -> Settings. On the settings page, click on the “Paths” tab and then the “Open XrmToolBox storage folder” link.
- Navigate to Plugins -> DLaB.EarlyBoundGenerator
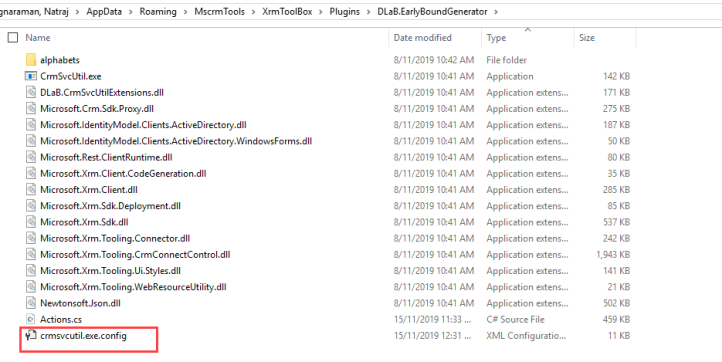
- Copy the crmsvcutil.exe.config file into a folder. You would need this for checking in into source control. This file won’t have any passwords, so it is safe to check in.
- Below is the PowerShell script to run. You also should committing this script into source control. The PowerShell script should be run on the same location where you copied the crmsvcutil.exe.config file in the previous step. The generated early bound classes will be in the folder specified in the “$outputPath” variable, which is “EarlyBoundClasses” in this script. You can change this match your solution folder structure.
Write-Output "Start"

$sourceNugetExe = "https://dist.nuget.org/win-x86-commandline/latest/nuget.exe"
$targetNugetExe = ".\nuget.exe"
Remove-Item .\Tools -Force -Recurse -ErrorAction Ignore
Invoke-WebRequest $sourceNugetExe -OutFile $targetNugetExe
Set-Alias nuget $targetNugetExe -Scope Global -Verbose
$connString = "AuthType=OAuth;Username=[LOGINNAME];Integrated Security=true;Url=https://[INSTANCENAME].[INSTANCEREGION].dynamics.com;AppId=51f81489-12ee-4a9e-aaae-a2591f45987d;RedirectUri=app://58145B91-0C36-4500-8554-080854F2AC97;TokenCacheStorePath=.\MyTokenCache;LoginPrompt=Auto"
$outputPath = ".\EarlyBoundClasses"
$namespace = "Xrm.Entities"

##
##Download EBG
##
./nuget install DLaB.Xrm.EarlyBoundGenerator.Api
move .\DLaB.Xrm.*\content\bin\DLaB.*\* .\EBG -Force
copy .\crmsvcutil.exe.config .\EBG -Force
Remove-Item .\DLaB.Xrm.EarlyBoundGenerator.Api* -Force -Recurse

.\EBG\CrmSvcUtil.exe /connstr:$connString /generateActions /out:"$outputPath\Actions.cs" /namespace:"$namespace" /codecustomization:"DLaB.CrmSvcUtilExtensions.Action.CustomizeCodeDomService,DLaB.CrmSvcUtilExtensions" /codegenerationservice:"DLaB.CrmSvcUtilExtensions.Action.CustomCodeGenerationService,DLaB.CrmSvcUtilExtensions" /codewriterfilter:"DLaB.CrmSvcUtilExtensions.Action.CodeWriterFilterService,DLaB.CrmSvcUtilExtensions" /metadataproviderservice:"DLaB.CrmSvcUtilExtensions.BaseMetadataProviderService,DLaB.CrmSvcUtilExtensions"
.\EBG\CrmSvcUtil.exe /connstr:$connString /out:"$outputPath\CrmServiceContext.cs" /namespace:"$namespace" /servicecontextname:"CrmServiceContext" /codecustomization:"DLaB.CrmSvcUtilExtensions.Entity.CustomizeCodeDomService,DLaB.CrmSvcUtilExtensions" /codegenerationservice:"DLaB.CrmSvcUtilExtensions.Entity.CustomCodeGenerationService,DLaB.CrmSvcUtilExtensions" /codewriterfilter:"DLaB.CrmSvcUtilExtensions.Entity.CodeWriterFilterService,DLaB.CrmSvcUtilExtensions" /namingservice:"DLaB.CrmSvcUtilExtensions.NamingService,DLaB.CrmSvcUtilExtensions" /metadataproviderservice:"DLaB.CrmSvcUtilExtensions.Entity.MetadataProviderService,DLaB.CrmSvcUtilExtensions"
.\EBG\CrmSvcUtil.exe /connstr:$connString /out:"$outputPath\OptionSets.cs" /namespace:"$namespace" /codecustomization:"DLaB.CrmSvcUtilExtensions.OptionSet.CustomizeCodeDomService,DLaB.CrmSvcUtilExtensions" /codegenerationservice:"DLaB.CrmSvcUtilExtensions.OptionSet.CustomCodeGenerationService,DLaB.CrmSvcUtilExtensions" /codewriterfilter:"DLaB.CrmSvcUtilExtensions.OptionSet.CodeWriterFilterService,DLaB.CrmSvcUtilExtensions" /namingservice:"DLaB.CrmSvcUtilExtensions.NamingService,DLaB.CrmSvcUtilExtensions" /metadataproviderservice:"DLaB.CrmSvcUtilExtensions.BaseMetadataProviderService,DLaB.CrmSvcUtilExtensions"

##
#Cleanup
##
Remove-Item nuget.exe
Remove-Item .\EBG -Force -Recurse

Write-Output "Complete"
You can see that I use OAuth for authentication. OAuth is one of the mechanism you can use to authenticate in the connection string. You can refer https://docs.microsoft.com/en-us/powerapps/developer/common-data-service/xrm-tooling/use-connection-strings-xrm-tooling-connect page for additional information. If you don’t like entering your credentials during script execution, you can also use “ClientSecret”, but this needs to be first configured on Azure AD. You can refer Nishant’s post about this https://nishantrana.me/2019/08/24/connect-to-dynamics-365-web-api-using-oauth-2-0-client-credentials/
Microsoft also has created a AppId and RedirectUri that you can use on you development or test instance. Below is the disclaimer on the docs page about these.
When using the
OAuthAuthType\AuthenticationType
For development and prototyping purposes we have provided the following AppId or ClientId and Redirect URI for use in OAuth Flows.For production use, you should create an AppId or ClientId that is specific to your tenant in the Azure Management portal.
Sample AppId or ClientId = 51f81489-12ee-4a9e-aaae-a2591f45987d
Sample RedirectUri = app://58145B91-0C36-4500-8554-080854F2AC97
Hope this helps.
